Monday, May 28, 2007

5) Some tools to start

Photo

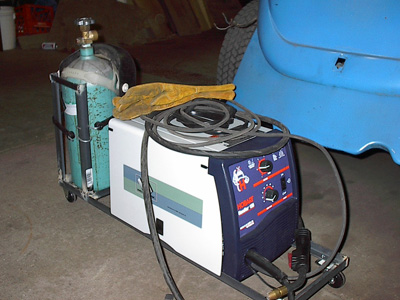
This is one handy welder!! Just a 115volt so that I can use it at the shop. It's perfect for welding thin sheet metal, and also very handy for thicker stuff too! (Later on I get into fabricating some custom parts using angle iron, square stock and thick sheet metal)


Photo

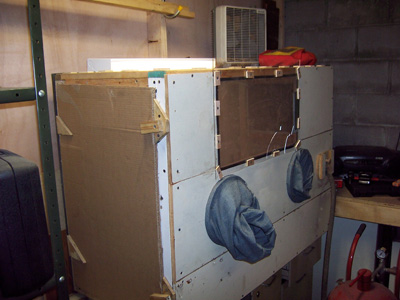
This is my home made sandblasting cabinet. I have this habit of really cheaping out on somethings when I could have just bought it instead and saved a million hours of work. But hey, it was fun, and this thing is functional! I'm using it with my 40lb pressure blaster. Yes those are jean legs sewed to gloves! And yes that's the uber cheap cardboard door option! : )

Labels:

4) The first cut

Photo

The first major surgery was getting the rear quarter panels off. It all started by cutting the rear end right off. While doing this major extraction I learned that you can't get entire panels off all at once without a lot of trouble, so the best way is to just chip away.

Photo

This is the right side rear quarter panel. Although it's not German, it's a very well made piece! It was made by VW of Mexico. I got both rears and both fronts from Rocky Mountain Motorworks. (now called Mid America Motorworks) I figured that I would install the quarters each as an entire piece. I fiddled with the idea of cutting it down the mid seam to save some time, but I found a lot of rust just behind the quarter windows and under the roof rails.

Labels:

3) Tearing it down!

Photo

I started by taking everything apart that I could get my hands on. I knew that eventually I'd be down to the bare shell and chassis. It starts with the big items (fenders, hoods, seats) and just keeps going and going, until I had small bags of bolts and pieces parts. The more I tore it down, the more awful rust I found! I knew this project was going to take some serious time to complete!

Labels: ,

Friday, May 25, 2007

2) The plan

Photo

I love everything about my bug, but there are always areas for improvement, right?! My vision is to have a beetle that looks like it was taken off the showroom floor, then modified in a way that still says stock, but drives like a new car. A little lower, a little better handling, a little more power under the hood, a little more (OK so maybe a lot more) stopping power*, and some subtlety upgraded wheels and tires. This is by no means a complete list, but it's a start! : )

Suspension
  • I will be using rear torsion bars from a '86 944 Turbo.
  • I will be using adjustable shocks all around. (have to research, Bilstien or Koni)
  • The rear will also utilize '86 944 Turbo aluminum trailing arms (the narrow ones)
  • I'm planning on lowering the rear one notch.
  • Up front I will have CB dropped spindles (2.5')
  • Adjustable beam with the adjusters welded in at natural so I can fine tune up or down.
  • The front beam will be narrowed 3"s to accommodate the wider wheels and brake setup.
  • I want to have good bushings either eurothane or something similar that won't squeak!
  • Rear sway bar will be an 18mm bar from a 944 Turbo.
  • Front sway bar: TBD (It will have to work with the narrowed beam, etc...
Brakes
  • I will have '86 944 Turbo brakes all around (Black 4-pots)
  • I will have the front hubs machined to work with the CB spindles and late offset wheels.
  • I will include a rear brake bias device so that I can fine tune the brake distribution.
  • The E-Brake will be adapted to use the 944 setup.
Engine / Transmission
  • I will be installing a stock EJ22 (2.2L) '96 Subaru Legacy motor.
  • I will be using a KEP adapter plate w/ a stage 1 clutch setup.
  • I will make my own wiring harness out of the Subaru harness.
  • I will use an after market fuel delivery system with new tubing running from the gas tank.
  • I will use the stock gas tank, but add a swirl tank, and bungs for send / return lines.
  • I will be using a stock Beetle transmission at first, then later on, upgrading it to use better gear ratios and stronger 3rd and 4th gear.
Cooling (I'll be taking a leap of faith from the old air-cooled world)
  • I will use a front mounted all aluminum performance radiator.
  • I will scoop air from under the car, plus provide a means for a little direct airflow to the radiator. (I'm thinking welding in a vent taken from the fresh air vent of a donor hood)
  • I will use aluminum tubing running under the car protected by some sort of channel built into the floor board.
  • I will be using a tubing beader to make sure all connections between tube and hose will be secure.
  • I will be utilizing a heating system under the back seat that will pump air to the front via the stock heater channels.
Wheels / Tires
  • I will be using 16" 944 "Phone Dials" in their stock finish. (They are 53mm offset)
  • I will be using aggressive tires, something like a Kumho MX, Falkin Azienth, or similar.
* I'm sick of the years and years I've dealt with drum brakes!! Time to not worry about stopping! : )

Labels:

Thursday, May 24, 2007

1) Welcome to the restoration! (A little history)

Main Photo

This blog will be devoted to my 1973 Volkswagen Beetle restoration. Let's start with some history:

- I bought the car when I was 17 for $500, not bad!
- Original color: light blue
- It was in pretty good running order, and I was able to drive it home, and register / inspect it with no problems!
- I drove it like that for 2 years!
- Finally one day I was driving over some dirt roads, and I noticed how the body would separate from the chassis over each bump! I found that I had some SERIOUS rust issues! Not only were the floors rotten all the way around, but under the back seat was almost all rotten. I was able to poke my finger through all over the place!
- I did a "Body off" restoration (my first time) and welded in a bunch of rust repair panels along with new floors. I also did my very own first paint job using acrylic enamel. It came out pretty good.
- I drove the car for another 3-4 years, complete with winter driving, which took its toll.

Photo

Photo

- More rust! So I learned some valuable lessons from my first restoration. Never buy crappy repair panels, and if you do, strip them of their crappy primer, because there is rust under there! My car practically started falling apart again from acute rusting of these new panels. I took the opportunity to do it right. So thus started the next body off restoration with as many German replacement panels I could find, plus a whole lot more! (read on)

Labels: